NDI Bridge, SRT and vMix in the Cloud (Chapter 11)
Get in Touch
-
To More Inquiry
(833) 888-9706
-
To More Inquiry
[email protected]
-
534 Trestle Pl, Downingtown, PA, USA
- Home
- Remote Production Workflows and Team Roles (Chatper 12)
Remote Production Workflows and Team Roles (Chatper 12)
By, Paul Richards
- 7 Aug, 2024
- 433 Views
- 0 Comment
In the fast-paced world of remote broadcasting, efficiency in operations is not merely an advantage—it’s a necessity. It’s important to create the workflow that aligns with the skills and tools specific to your team’s roles. This alignment leads to quicker turnaround times and more effective resource utilization, crucial in high-pressure environments where precision and speed are vital.
For producers, the workflow should enable coordination across the production team. Camera operators benefit from workflows that allow for seamless integration with remote technologies such as robotic PTZ cameras. Color correction specialists require workflows that support high-fidelity color grading tools to maintain visual coherence throughout the footage. Audio mixers thrive in environments where audio feeds are effortlessly integrated and remotely manageable.
Scalability is another vital consideration, particularly in response to fluctuating audience sizes and market demands. A scalable workflow accommodates growth or contraction without extensive overhauls—essential for maintaining continuous operations and cost-effectiveness. This is especially important in remote production settings, where adapting quickly to new technologies and processes can significantly impact performance and output quality.
Understanding the diverse roles within a remote production team is crucial for optimizing workflow and enhancing the overall quality of the production. The following table breaks down key positions, highlighting their responsibilities, required skills, tools and equipment used, and the outcomes they are expected to deliver. This structure helps in identifying how each role contributes to the success of the production, ensuring that all team members are equipped with the necessary resources and skills to perform their tasks effectively. Whether overseeing the project as a producer, capturing visuals as a camera operator, fine-tuning the aesthetics as a color correction specialist, or balancing the audio landscape as an audio mixer, each role is vital to delivering a polished final product.
Role | Responsibilities | Skills Required | Tools/Equipment Used | Key Outputs |
Producer | Oversees the entire production process, manage the budget, coordinates among different departments, ensures timeline adherence | Leadership, budget management, comms, problem-solving | Production software like ShoFlo, communication tools | Completed production, managed team, budget reports |
Director | Calls the shots, selecting among many different sources to tell a cohesive story | Visual story-telling, live, real-time show management, switcher operations, calm, cool demeanor in stressful situations | Hardware & software production switchers, production software, communication tools | Program Output for live streaming and/or “live-to-tape” recording |
Technical Director (TD) | Control the production switcher and other control room technologies | All control-room-based technologies | Program and other outputs for live streaming & recording | |
Camera Operator | Operates cameras during live events, ensure proper framing, focusing and movement | Camera handling, technical knowledge of broadcast cameras, attention to detail | Cameras, tripods, monitors | High-quality video footage |
Color Correction Specialist | Adjusts color settings to ensure video quality consistency across various shots | Color theory, video editing software proficiency, attention to detail | Camera Control Units (CCUs) video editing software, calibrated monitors | Matched cameras, Visually coherent footage |
Audio Mixer | Manages and adjust audio feed during production, mix sound sources, ensure clear audio output | Audio mixing, knowledge of sound equipment, acute hearing | Audio mixing console, microphones, headphones | High-quality audio feed |
Graphics Specialist | Manages all the static and animated graphics for production | Some basic graphic design, text layout, live event experience, attention to detail | Photoshop, PowerPoint, New Blue FX, Singular.Live, etc. |
Description of Each Role
- Producer: The producer is akin to a project manager and is responsible for the overall execution of the production. This client-facing role involves high-level planning, budgeting, and coordination among all other roles to ensure the production runs smoothly and meets its objectives.
- Director: The director is responsible for “telling the story” of the show by calling the camera shots and other sources that can be mixed together in the video switcher. Sometimes this role is combined with the producer role and/or the technical director role. Whether working in a combined role (common on smaller, less complex projects) or discrete roles, the person in this role is responsible for guiding the efforts of all production crew members. In the live events world, this role is sometimes called “show caller” and includes directing the activities of Zoom/Teams specialists who manage remote participants, open/close breakout rooms and who launch polls and surveys.
- Technical Director: Like the name suggests, the technical director (TD) is responsible for the set-up and operations of the control room technology. This person may be a “one-man-band” who, in addition to operating the live production switcher, controls shading (camera coloring), video playback, graphics, sound, encoding, recording and all other aspects of control room production. When in a more discrete role, the technical director takes his cues from the director. Often the director and TD are the same person—especially in smaller, less complex and budget-constrained productions.
- Camera Operator: This role focuses on the technical aspects of filming. The camera operator is responsible for capturing the live action as per the director’s vision. This includes making real-time decisions about shot selection, camera movement, and focus.
- Color Correction Specialist: After footage is captured, the color correction specialist ensures that the footage maintains consistent quality and color accuracy. This role is critical for post-production, enhancing the visual appeal and ensuring that the footage has a uniform look.
- Audio Mixer: Responsible for all aspects of sound during a production, the audio mixer manages live audio mixing and ensures that the audio quality is maintained at a high standard. This role is crucial for live broadcasts where audio cues and ambient sound need to be balanced with dialogue.
- Graphics Specialist: often called a graphics operator, the person in this role takes their cues from the director to ensure that the right text, PowerPoint, photos, images and animations are fed into the production switcher (and started/advanced) at the right time.
Remote Production Workflow: Producer
A producer’s job starts long before the event begins. This can involve project management in general which involves a high level understanding of the entire workflow. Producers may even manage equipment and use an equipment management system such as Cheqroom or CurrentRMS. From understanding the gear necessary to complete a project, to tracking gear availability and scheduling a producer’s job is never easy.
Producers often create proposals for clients and have a strong understanding of client expectations. Even when sales and project management roles are separated from the producer’s task, they are often responsible for the end product, down to the details of when to cut between which source.
A pro tip for new producers, 95% of camera transitions are the CUT function. New producers often overuse fancy transitions such as stingers, merges and crossfades. While they look great, they can actually be distracting if overused. With that being said, stinger transitions can be effectively used when transitioning from live camera feeds to other types of media such as instant-replay footage or a presentation.
Remote Production Workflow: Camera Operator
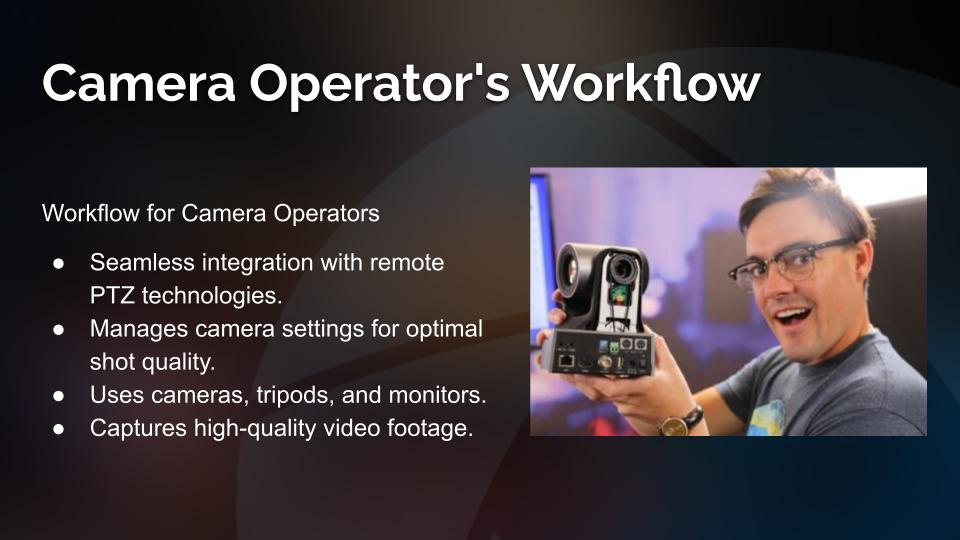
In remote production workflows, the camera operator plays a crucial role that blends technical knowledge with artistic vision. Camera operators need to be adept at managing their equipment, understanding key functions like zoom and focus controls, white balance, and shutter speed. Technical proficiency is essential because operators must ensure all camera settings are optimized for each shot and be able to troubleshoot issues promptly. This is crucial to maintain seamless production, even when working remotely where on-site support may be limited.
Next, the operator must apply these technical skills practically by mastering shot composition. They should be well-versed in principles like the rule of thirds, headroom, and lead room to frame subjects effectively, creating visually engaging shots. They also need to adjust their camera movement based on the producer/director’s vision, ensuring smooth transitions and dynamic angles that align with the production’s overall style.
The artistic component is equally vital in this role. While it’s challenging to formally teach artistic vision, camera operators must be encouraged to observe how professionals craft compelling visuals, to experiment creatively, and to listen and anticipate changes in the production environment. In remote setups, this means staying highly attuned to the director’s guidance and reacting swiftly to evolving demands.
Robotic PTZ cameras have traditionally been difficult to remotely control. In fact, I wrote a book called the PTZ Camera Operators Handbook in 2022, which may serve as a helpful reference for those new to PTZ camera operation. Many advancements have been made over the past couple of years including auto-tracking and auto-framing. Auto-tracking allows PTZ cameras to automatically lock in on a specific subject and track that person with pan, tilt and zoom movements. Auto-framing is a similar technology designed to maintain specific framing (i.e. MCU, MS, WS with specific headroom or left/right lead room) while panning, tilting and zooming to follow a single subject or a group. Auto-framing can also imply that all subjects in view will be framed using automated pan, tilt and zoom movements.

In addition to automation tools, more powerful manual robotic camera tools have been developed as well. The image above shows several of the PTZOptics Hive robotic camera tools that allow remote operators more control over their cameras. Click to Center is a simple yet powerful way to quickly move PTZ cameras to the correct location during a broadcast. Hive also offers a “Cine-Center” option for moving the camera more slowly and gracefully when it is being done during a live broadcast. The next tool in the image above, is called “Fast-Frame” which is used to choose any size frame on screen and have the PTZ camera move directly to that location. These tools represent the next generation of PTZ camera movement tools, as they enable productivity gains for camera operators.
In summary, the remote production camera operator must seamlessly merge technical skills with creative intuition, adapting fluidly to dynamic conditions while delivering high-quality visuals that enrich the production. Their work contributes significantly to the overall storytelling, as their shots bring the narrative to life even from afar.
Remote Production Workflow: Color Correction
For remote color correction, you can effectively employ two distinct approaches—adjusting the camera settings directly and using live production software. Below is a structured table that outlines each method, highlighting their benefits and considerations:
Approach | Description | Key Settings/ Tools | Benefits |
Camera Settings Adjustment | This method involves directly configuring camera settings such as Iris, Shutter Speed, Gain, and built-in Color Correction to achieve the desired image quality at the source | Iris, Shutter Speed, Gain, Color Correction | Optimizes image quality from the start, adhering to the principle of “garbage in, garbage out,” where the quality of input directly influences the output. Ensures the best raw ISO (isolated individual camera) recorded footage for post-production |
Color Correction in Live Software | Utilizes software tools within live production environments to adjust colors and correct images during the production process | Live production software, color grading tools such as Vectorscope and Waveform Monitor | Allows for flexible, real-time adjustments and enhancements during live events, providing the ability to adapt to changing lighting conditions and other variables on the fly ISO recordings DO NOT include color correction |
- Camera Settings Adjustment: This approach is foundational, as it ensures that the footage captured is of the highest possible quality right from the camera. Adjusting settings like Iris and Shutter Speed helps in controlling the exposure, while Gain and Color Correction settings adjust the brightness and color balance, respectively. This proactive method minimizes the need for extensive post-production correction, aligning with the concept that the quality of output is only as good as the quality of input. Ensuring high-quality input is critical in remote production, where real-time corrections might be limited.
- Color Correction in Live Software: When using live production software, the color correction process becomes part of the live editing workflow. This method is highly adaptable, allowing operators to make immediate adjustments based on the live feed. It is particularly useful in dynamic environments where lighting conditions can change throughout the day or unexpectedly (like when a presenter walks out into an unlit audience) or when multiple cameras with slightly different color profiles are used.
Both approaches have their distinct advantages and can be used in conjunction depending on the production’s specific needs and the environment. The choice of method often depends on the level of control required and the nature of the broadcast event.
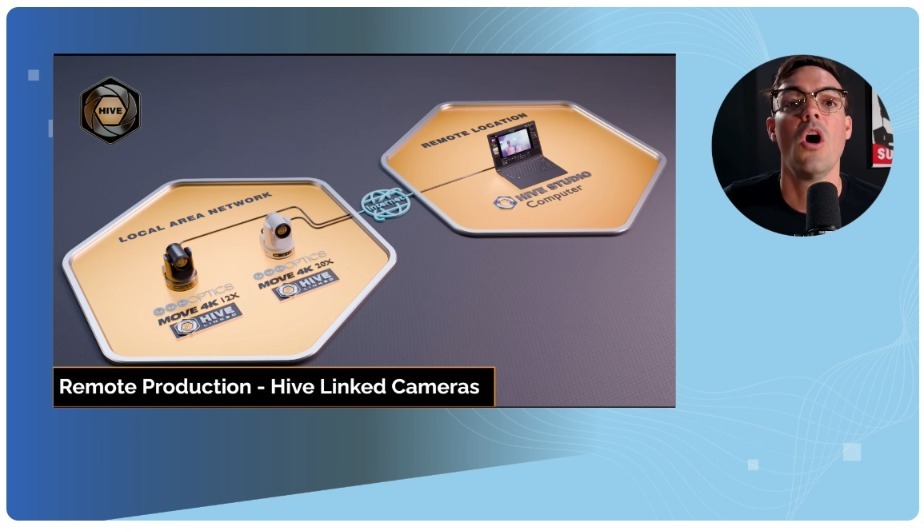
Remotely controlling color correction is a great workflow utilized by professionals who need multiple cameras color corrected for a live event. vMix is an excellent tool for this purpose, featuring robust camera color correction tools such as a vectorscope and waveform monitor. In this workflow, we will demonstrate the use of several PTZOptics Hive-linked cameras, which are capable of sending NDI video feeds to a Local Area Network (LAN) from a remote location by leveraging the cloud connection to Hive. Once the NDI video sources are accessible on the LAN, we can proceed to color correct them using vMix.
A big part of making your live production look great is making sure your colors look realistic and match from camera to camera. vMix includes color correction tools that are advanced enough for color optimization experts yet simple enough that average users, especially those with video editing experience can improve their productions’ overall look. Color correction tools are available on every video input, including cameras, videos, and images.
To start, set all cameras to the same color temperature. If possible, place all cameras next to each other and have them shoot the same subject at the same time — such as a wide shot of a scene. In the past, video engineers would place a black and white logarithmic reflectance chart called a “chip chart” on a music stand for all cameras to shoot, but today’s easy-to-use color controls don’t require that — though almost any modern color chart can serve as a good starting point.. The basic idea is to first adjust flesh tones, then the other colors and black, white and gray values look natural and creatively satisfactory—on one camera (your “reference” camera) and then share those settings with other cameras and tweak them (one at a time) until you don’t notice any changes in the color, black, white or gray images among cameras. This is a “best outcome” and will sometimes require some time and patience to achieve – or at least come very close. Using a vectorscope & waveform monitor, as described below, can help.
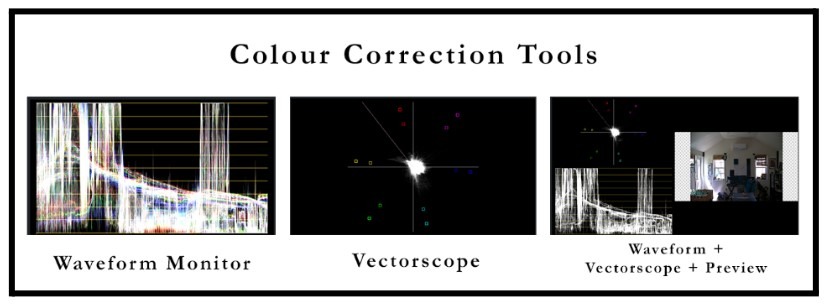
Color Correction Tools
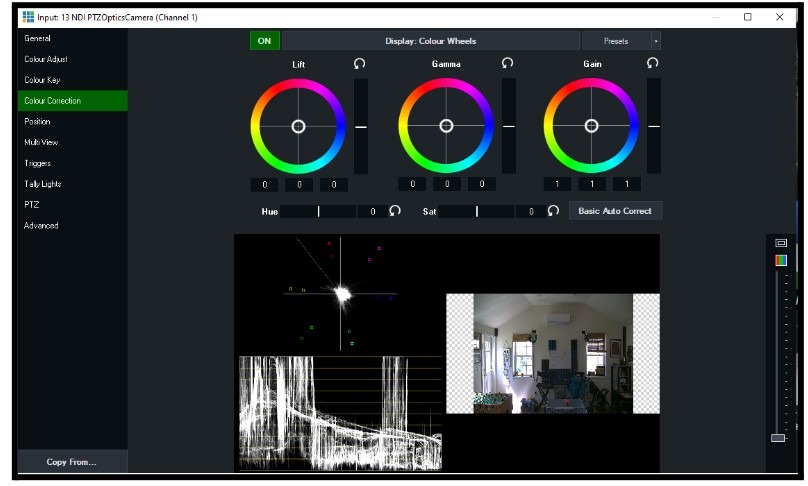
For exacting color control, select Colour Correction from the input settings menu to access the professional color correction tools. The interface offers control over the lift, gamma, and gain. The lift adjusts the dark areas of the image, the gamma impacts the gray values in between black and white, and the gain adjusts the bright areas of the image.

The most basic function on this menu is the Basic Auto Correct button that attempts to set the lift and gain controls to their optimum setting. Also found on this page are several reset buttons shaped as a circular arrow to undo any settings that you would like reverted to default. The “copy from” at the bottom left-hand corner of this window allows you to copy the color settings from any other input—which is useful as a starting point, especially when using multiples of the same camera.
The color correction tools inside vMix have three (3) wheels which are used commonly in video editing software. The first wheel represents the blacks (shadows) also called lift. The second wheel represents gamma or mid tones and the third wheel represents the highlights and overall brightness of the image. Each wheel adjusts a particular part of the image. The first wheel can be used to work with dark areas, the middle wheel works on areas which are usually skin tones and the final wheel is for the highlights. Using the three components of the color correction wheels allows operators the ability to do fine color correction in an intuitive layout. You can use gain control, for example, to adjust the yellows just in the highlight of an image.
Adjustment can be made on the color wheel by dragging the circle to the desired location. Adjustments can be made to all colors equally by using the Luminance/Brightness bar to the wheel’s right. Hue and saturation can be adjusted using the bar below the wheels.
Pro Tip: Try using the ON/OFF buttons to see the color corrections you have applied. Sometimes it’s worth seeing all of the changes you have made by looking back at the original.
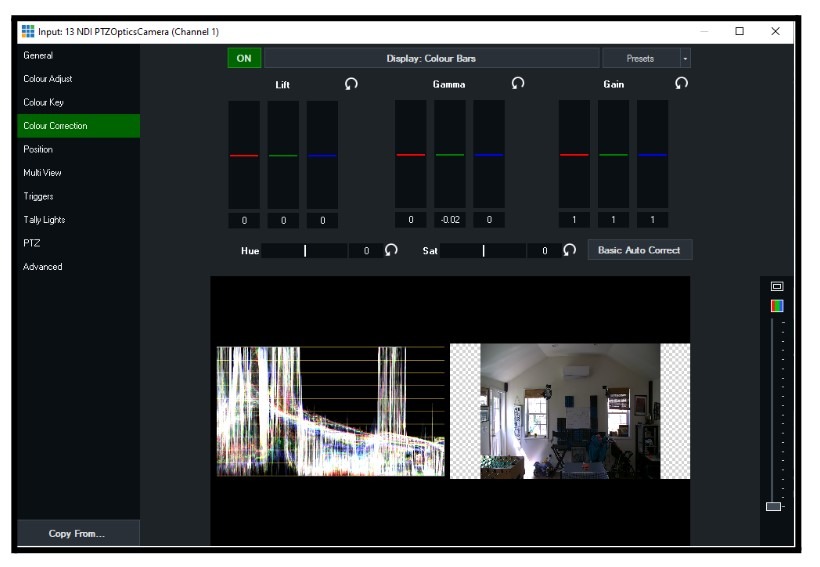
Color Bars
By clicking on Display Color Bars at the top, the view will be changed to color bars here. The red, green, and blue levels can be adjusted independently for lift, gamma, and gain. Color bars are easier to operate than wheels because wheels are constantly adjusting multiple colors with every change. Bars allow you to adjust a single color independent of others. If you are just learning how to perform color corrections or you are trying to fix a specific color issue, color bars may be easier for you to operate than wheels.
What is a Vectorscope?
A Vectorscope is a tool that represents the colors within your image. It’s a graphic representation of the individual colors and the amount (chromanance/saturation) of each for the input currently in Vmix’s preview window. The various boxes represent the colors in NTSC color bars and their relationship to each other—red, magenta, blue cyan, green and yellow. Caucasian flesh tone usually appears on the diagonal line between red and yellow. A Vectorscope is a tool that is ideal for live video color correction without having to rely on your own eyes and potentially inaccurate monitor representations of an image. The key is to look for little to no variation when switching among cameras in preview—making minute adjustments to all but your reference camera.
What is a Waveform Monitor?
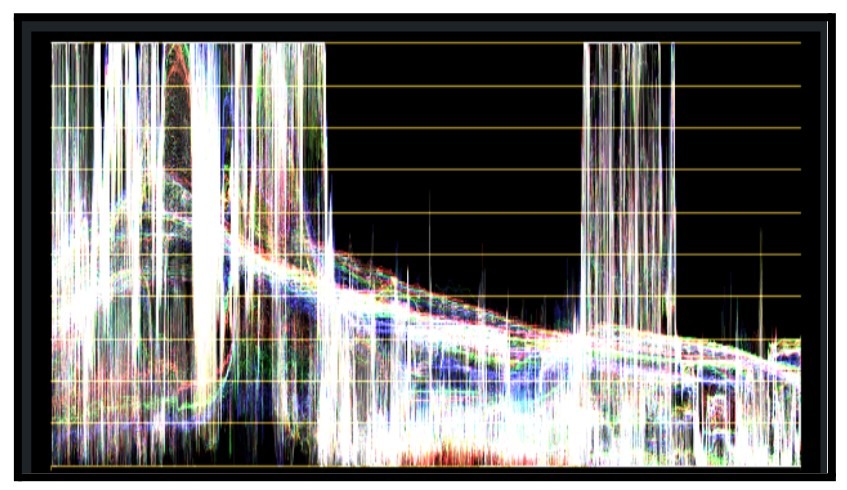
For those with color correction experience or those who want to learn, vMix also includes several types of Waveform Monitors. The Waveform Monitor is the counterpart to the Vectorscope and measures white, black and gray levels relating to brightness, contrast and exposure. With a Waveform Monitor, you can easily see if the whites in your image are clipping (flat line) at the top or if the blacks (at the bottom) are being crushed (often purposefully). You can also see the gray values change when you adjust gamma. The Waveform Monitor will allow camera operators the ability to adjust the image preferably in the camera first to ensure your image has a good exposure.
Ideally, you want your camera’s image to be within the limits of your Waveform Monitor. You can use vMix to make sure your video has appropriate whites and blacks using the tools as needed. Flesh tone usually looks natural at 70% (which broadcasters call 70 IRE units) and whites max out at 100%, though may lose detail at that setting or higher. Blacks usually look normal at 7.5% but can sometimes be “crushed” (lowered) to increase contrast, but may lose detail too.
The tool can be accessed by clicking the small color bar box on the right side of the video preview. Each of the waveform monitor options can be viewed in a split-screen with a preview of the input or in a full screen independently. These are essential for completing precise luminance, correction adjustments—even across colors. Using the slide on the right, the zoom level of the image can be adjusted. Users can make adjustments to the color setting wheels and bars while seeing the precise impact on the waveform monitors. This can often help even novices detect and correct luminance, lift and gamma issues.
Remote Production Workflow: Audio Mixing Role
In a remote production workflow, the broadcast audio engineer is crucial for achieving high-quality sound in live broadcasts and recordings. With advancements in technology, audio engineers can now work from remote locations instead of being tied to the event venue (except for the public address (PA) mixer at the venue). This flexibility allows centralized management, reduces costs, and ensures consistent sound quality across multiple broadcasts.
The primary responsibilities of an audio mixer include overseeing microphone setup, ensuring clear signal capture, and managing sound levels from various sources. They often use digital mixing consoles, whether physical or virtual, to balance audio channels for dialogue, music, sound effects, and ambient noise. Collaboration with the production team is essential to align audio with visual and narrative elements, while technical troubleshooting skills help quickly resolve sound issues.
Modern audio mixers also integrate automation and artificial intelligence (AI) tools, like automix and noise reduction features, to simplify their tasks and maintain consistent sound quality. Familiarity with digital signal processing (DSP) systems and network protocols, such as Dante or AES67, is helpful in managing signal routing and processing.
In summary, the audio mixing role in a remote production workflow is all about maintaining cohesive, high-quality sound that aligns with the artistic vision of the production. With new technology making it easier to work remotely, the role continues to evolve to meet the growing demands of modern broadcasting.
Team Communications
Remote productions require a seamless flow of communication to synchronize activities across various locations. Effective use of communication tools like Discord, Unity, or Zoom is critical to maintaining a cohesive team dynamic and ensuring that project milestones are met. These tools not only facilitate straightforward communication but also support complex collaborative needs involving multimedia sharing and real-time feedback. At the 2024 NAB live stream I mentioned earlier in this book we used Unity Intercom to communicate with the remote production team in Florida. Unity is a smartphone and computer-based based intercom system. If you are managing a remote team that is involved in live production, communication is key. Learning how to utilize these communication systems effectively determines the efficiency and success of remote productions.
Here are three prominent communication platforms: Discord, Unity Intercom and Zoom (or any conferencing app). Well known broadcast intercom maker Clearcom uses a hybrid approach that allows their wired and wireless intercom systems to connect to their web-based servers and then to cell phones running their Agent IC app.
Discord
Discord, originally popularized among gaming communities, has evolved into a robust communication tool for various teams and projects. It offers text, voice, and video communication across diverse channels, allowing for seamless interaction among team members. Discord’s server and channel structure is particularly conducive to managing large teams where members can segment into specific groups according to project needs or departments. This flexibility makes it an excellent option for teams working in remote or hybrid setups, as it supports synchronous and asynchronous communication effectively.
Unity Intercom
Unity Intercom and Unity Cloud are pivotal in enhancing communication for remote productions, providing innovative, accessible, and cost-effective communication solutions on a global scale.
Unity Intercom (local Mac server) offers a robust system for remote communication, supporting up to 128 party line (PL) channels, 64 groups, and 64 external program feed/mix-minus channels, along with person-to-person private communication. It integrates seamlessly with local sound consoles and external communication systems, offering broadcast-quality audio that is essential for effective remote production communication.
Unity Cloud, on the other hand, serves as a simplified, cloud-based alternative to the more feature-rich Unity Intercom system. Ideal for situations where a full-featured, self-hosted system is unnecessary or hosting on a Mac is not feasible, Unity Cloud supports a single group of users sharing six party-line channels. Its setup process is streamlined through an online web portal, making it an accessible option for various remote productions to maintain constant connectivity among team members, regardless of their location.
Together, Unity Intercom and Unity Cloud are reshaping remote production workflows by eliminating geographical barriers and fostering more cohesive and efficient team collaborations.
Zoom
Zoom has become synonymous with remote communication, particularly noted for its video conferencing capabilities. It provides a reliable platform for virtual meetings, webinars, and live chat options. For teams operating in separate locations, Zoom’s features like high-quality video, screen sharing, and real-time messaging are indispensable. It ensures that team members remain connected and can collaborate effectively despite geographical distances. Furthermore, Zoom’s ability to host large numbers of participants and integrate with multiple calendar systems and workflow tools makes it a preferred choice for corporate and creative environments alike.
Embracing remote production is not merely about adopting new technologies but about rethinking how media is produced and delivered in a digital age. The insights gained from this chapter should serve as a foundation for broadcasters and media professionals to build more resilient, flexible, and creative production capabilities. By doing so, they can not only overcome the logistical and financial challenges associated with traditional production methods but also unlock new opportunities for growth and engagement in an increasingly interconnected world.
KEY TAKEAWAYS FROM THIS CHAPTER:
- Customized Workflow Alignment: In remote production, workflows should align with each team member’s skills and tools. When workflows are tailored to specific roles like producers, camera operators, and audio mixers, turnaround times improve, and resources are used more effectively, essential in high-pressure environments.
- Role-Specific Requirements: Each role in a remote production setup has unique requirements. Producers require seamless team coordination, camera operators need integration with remote technologies, color correction specialists need tools for high-fidelity grading, and audio mixers need streamlined audio feed management.
- Scalability and Adaptability: Remote workflows should be scalable to accommodate changing audience sizes and market demands. By remaining adaptable to new technologies and processes, teams can maintain continuous, cost-effective operations in fluctuating circumstances.
- Effective Communication Tools: Collaboration in remote productions relies heavily on tools like Discord, Unity, or Zoom. These facilitate multimedia sharing and real-time feedback, ensuring seamless communication across geographically distributed teams for efficient project execution.
Remote Production Software Tools (Chapter 13)
Recent Comments
Category
- Audio (1)
- AV Management (2)
- Book (18)
- Education (1)
- NAB Show (1)
- NDI (4)
- PTZ Controls (6)
- Remote Production Software (20)
- Sports (3)
- Studio Management (2)
- Training (7)
- Uncategorized (4)
- vMix (3)
New Tags
auto-tracking AV Management AV Monitoring bandwidth Book broadcasting broadcast technology camera compatibility camera presets camera settings cloud-based platform CloudFlex color correction Education Epiphan Hive Hive PTZ Hive Setup innovative technology IP Video live production live streaming metro NAB Show NAB Show 2024 NDI NDI Video Source Peplink professional broadcasting professional video PTZ camera control PTZ Controls PTZOptics PTZOptics Hive real-time collaboration remote production remote video production Sports Sports Broadcasting USB Cameras video broadcasting video content production video equipment video production vmix

